The Nursery is Wallpapered!
/Eeep! The nursery wallpaper is up and I’m absolutely smitten!
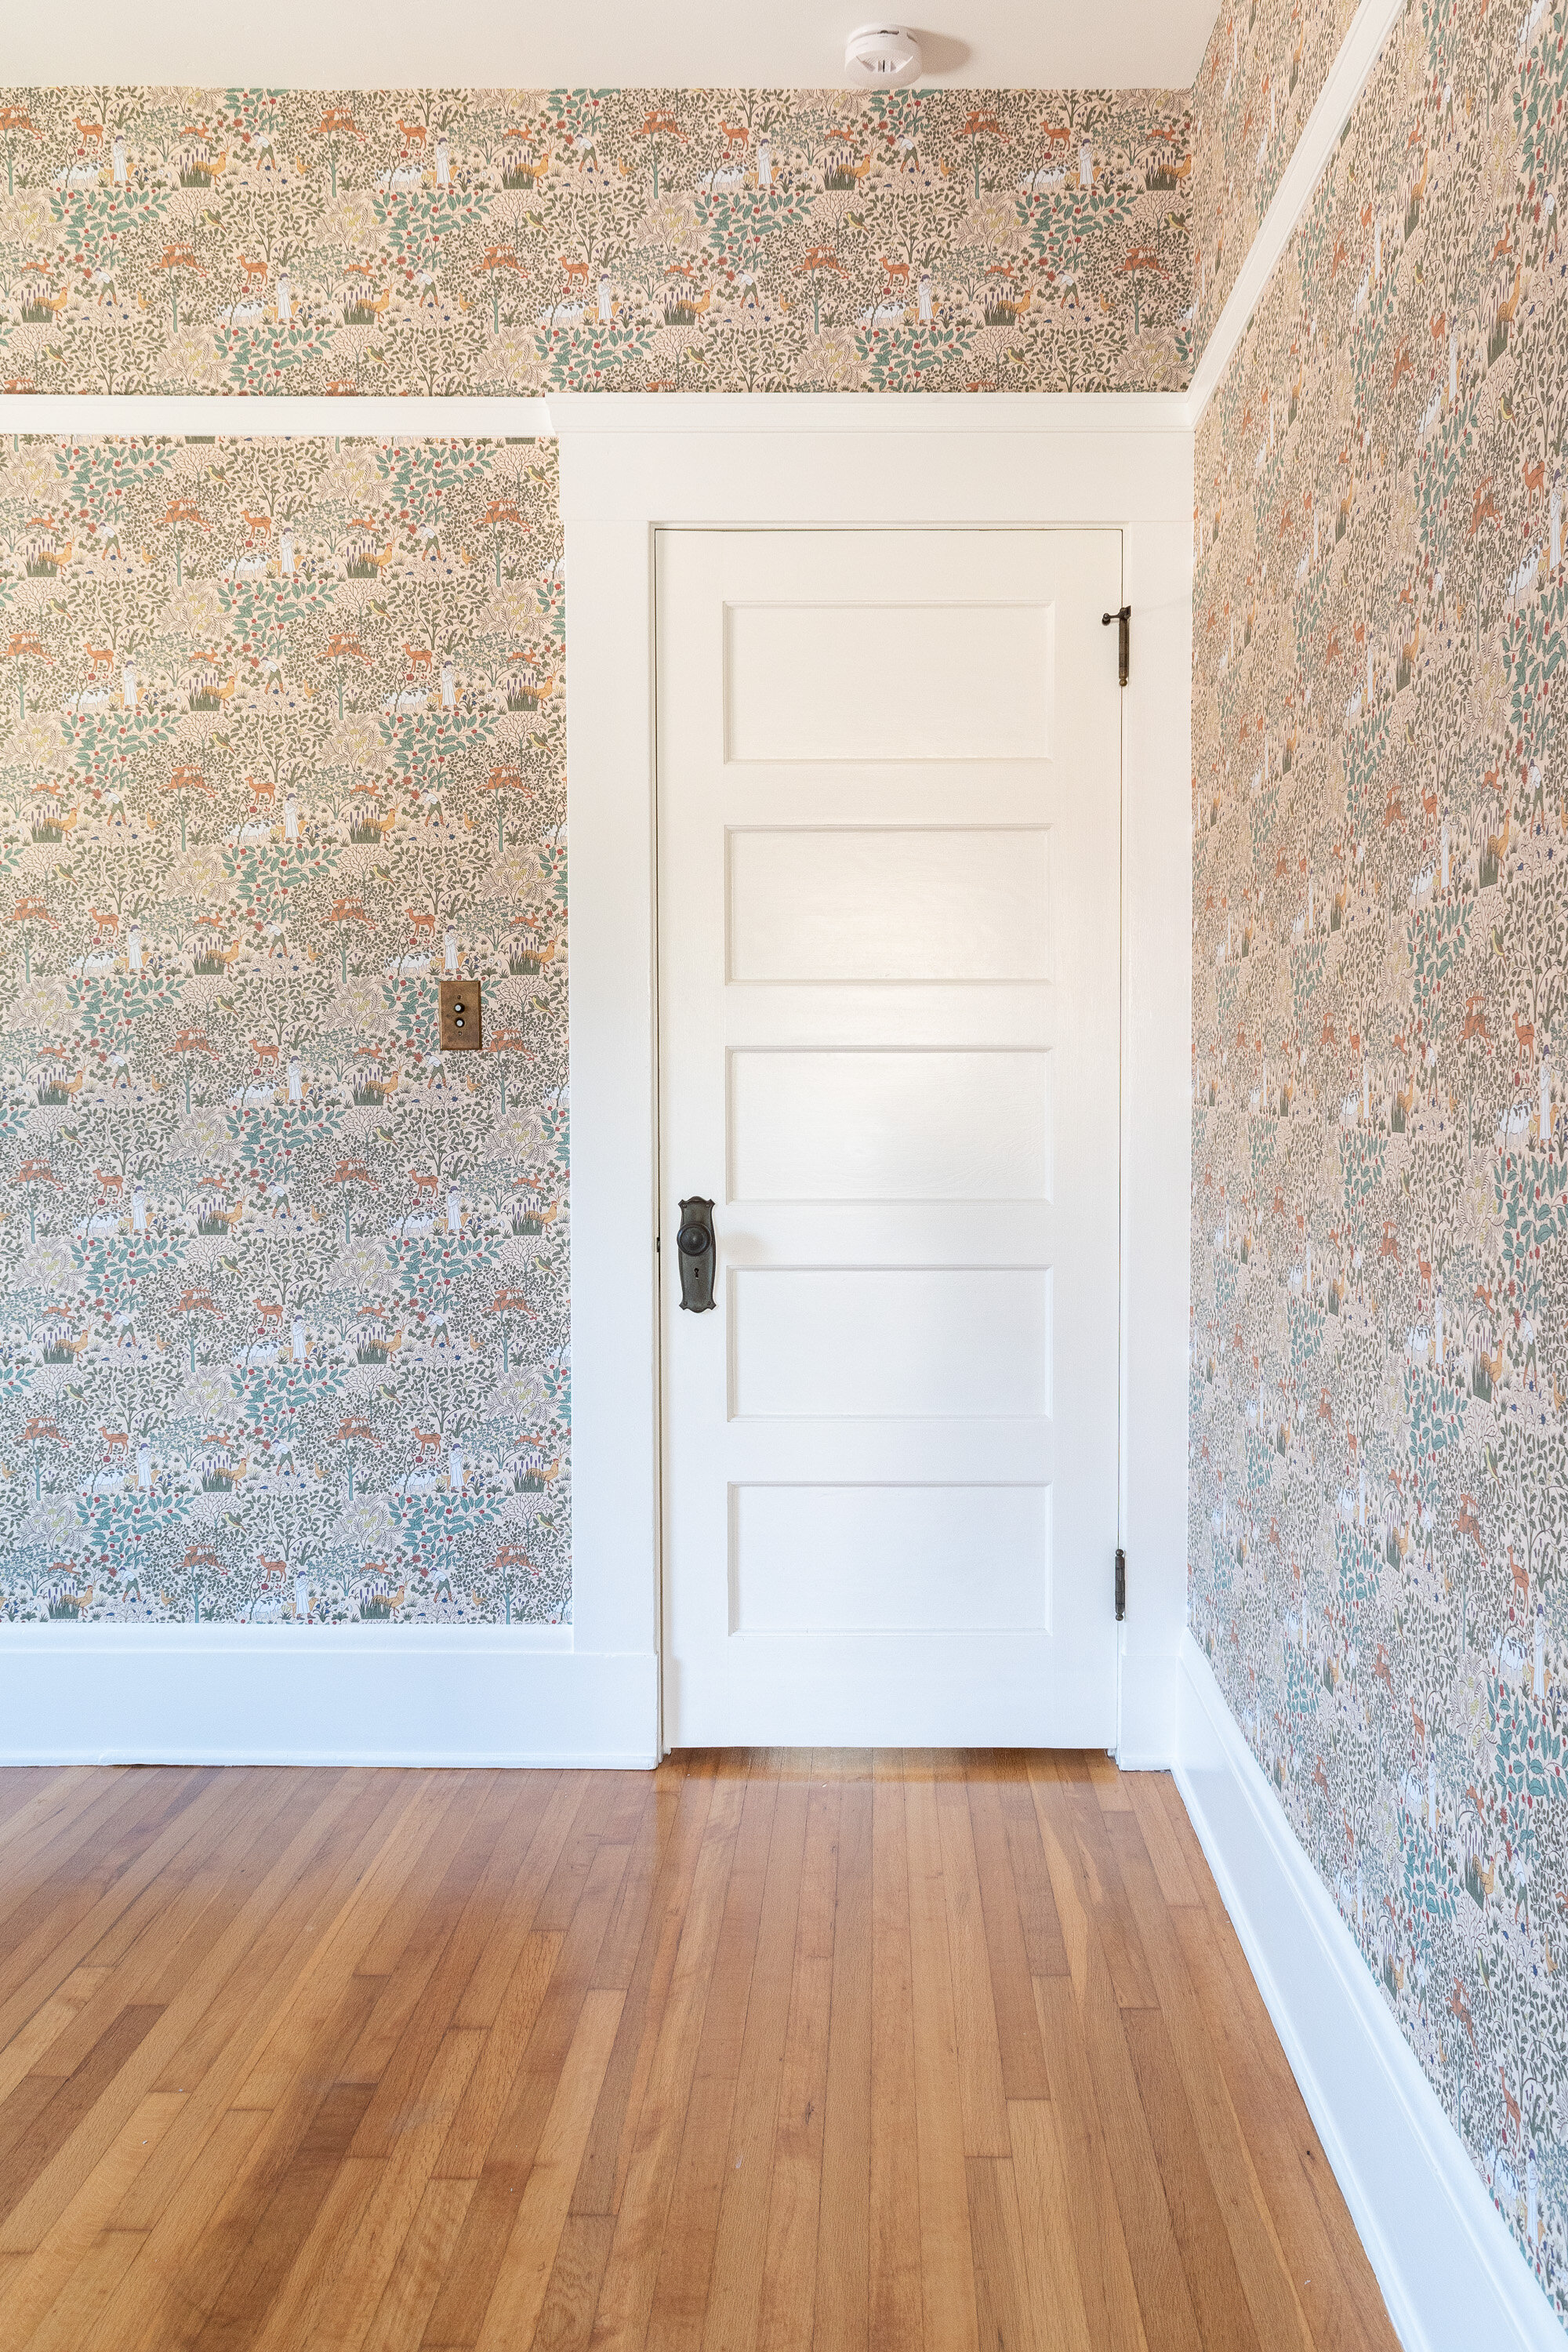
I debated the wallpaper for quite some time but eventually, we chose The Shepherd by Charles Voysey who was a prominent designer in the Arts & Crafts movement (perfect for my historic home). The colors, the motif, the historic quality, the scale, the texture of the paper, the charm, mmm! I love it all!
I’ve listed my favorite resources for wallpapers on the My Favorite Shops Page under - you guessed it - the “wallpaper” section. Some are modern papers and others are historic papers. I was pretty committed to doing a paper that fit the age of our 1914 historic home. Partly because it felt like the right thing to do, and partly because it helped me narrow down my options - the perfect technique for an indecisive person!

I really wanted to take on the wallpapering process myself. It’s a detail-oriented project that seems like a fun way to spend the weekend. But, at 8.5 months pregnant, I’m getting pretty top-heavy and easily exhausted climbing ladders while holding tools over my head. If I wasn’t so wrapped up in kitchen catastrophes and other house projects, maybe I could have tackled the project in my second trimester. But, here we are, so we hired it out and I’m so so glad we did!

Before calling in the wallpaper pro, I did do some prep work myself.
I patched the walls. We previously had our wifi router in this room, but have since moved it to another part of the house, so we patched up the hole where the ethernet came in. We also moved a light switch to another wall and had some dings to mend. Then, I coated the fresh drywall in drywall primer.
I painted the picture rail molding to match the trim. I wanted it to stand out with the trim rather than blending into the walls like it did in the previous iteration of the room.
I also painted the walls along the edge of the trim in the same color as the trim to make sure that no green paint would be visible. I’m pretty meticulous with cutting in paint, but I wanted to be extra sure that none of that green wall paint could poke out between the wallpaper and the trim. Going in to touch it up later would be such a pain!

I always recommend painting overalls, a handy paint pail, and a kneeling cushion for painting projects! I also brought in my air filter to reduce fumes - even though the paint is a low VOC paint.

You’ll notice from the photos above that I decided to stick with the white paint that we already had on the walls. The Benjamin Moore Simply White is a lovely hue that has never done me wrong. However, my initial design was to really play with colors! I wanted to use toned-down yet bold colors to give the room a more dynamic, playful, and unique look. I thought red trim would be a funky way to dress up the room and call attention to the woodwork. After all, we’ve discovered that the woodwork throughout the house had always been painted fun colors from canary yellow to pink, and dusty blue to olive.
I’ll admit that white trim has been feeling really boring to me lately. But, then look at me, I painted it white. Oy.

But! While I “played it safe,” I really really love the white. Because there are whites in the paper, the trim feels cohesive rather than just “safe.”

And the good news is, there are still plenty more colors to pull out of the wallpaper to use in accent pieces! The room has a very soft and pretty feel right now, but I can definitely liven it up with some bold hues! Or, maybe I’ll embrace the pretty and do more soft colors. We’ll see! It’s a work in progress.
Psst: All about my push button light switches is outlined here.

We hired Bill to install the wallpaper and he did a marvelous job! He’s a self-taught wallpapering wizard who switched from doing construction work to hanging paper 37 years ago and has never looked back. He estimates he’s hung 11,000 rolls of paper in his career!
He started the work at 8:30 am and was done by 3:30 pm. This also included a lunch break, a break to eat the chocolate cake I brought him, and a break to tell me his story of how he got into the wallpaper business. Had I left him alone and not marveled at his work repeatedly, he probably could have installed all 8 double-rolls of paper in 5 hours (including his prep time).

He started the day by laying down tarps, setting up his table, and gathering supplies. Then, he painted the walls with a wallpaper primer to ensure good adhesion and make the paper paste grip the walls better.
He then planned where he’d make cuts then got to wallpapering. He rolled on adhesive and “booked” it like the pros do. Here’s a video of that process.
Then he repeated and repeated around the room.

For reference, here are the dimensions of the room. Bill estimated we would need 8 double-rolls or 16 single-rolls of paper for this space. He used each roll, but we do have lots of scrap remnant rolls for patching.
Aside from picking a paint color and the paper itself, the final decision to make was where the paper would start and stop. While each roll lines up with the prior one, you gotta start somewhere and know that by the time you paper all around the room, the termination won’t match with the starting point.
I debated for a while and had a fair amount of options. The ideal place to start/end is where there’s very little paper and where it’s hidden. Along trim and behind a corner doorway is a good spot! This room has three corner doorways which made for good options because the paper would only be mismatched above eye level and only for a few feet from the top of the door to the ceiling.
But each of these doorways are so visible! The two doors on the left are used constantly as a hallway from room to room. And the closet door in the lower right corner is pretty visible when entering the room. Ultimately, Bill and I decided the best spot would be the corner of the bump-out (seen above on the dark wall next to the “3” in the diamond).

And here’s how it lined up (look along the top of the corner). It’s so so close to almost magically lining up, but it didn’t - and we never expected it to. When Bill was getting close to the last roll he said we could come very close to having the start/stop point match which has only happened about 2 times in his career. We agreed we’d buy lotto tickets if the seams magically matched. They came pretty close, so maybe we should still place bets since we got so lucky?
While the seams aren’t a perfect match, they’re hardly visible considering the angle of the corner and the amount of detail in the pattern. Can you even see it in the photo below?
You’ll notice that the edges of the paper on this bump out look ridiculous because I never finished the process of re-installing the jamb, hanging the door, adding the casing, replacing the baseboard, or putting the picture rail on the wall to the right.

It leaves the room pretty unfinished but I’ll get to it one day! Hopefully soon, not sure when, but definitely one day.

When Bill was all done he said “It was a pleasure hanging this paper! The quality of the paper was excellent and the pattern was really pretty to look at.” I was touched!
Speaking of quality, the paper was thick and opaque enough that it wasn’t an issue to install over very high-contrast patch jobs. If the paper were thin, like some others, I would have had to paint all the dark green and patchy walls one light hue.

The texture of the paper even has a fabric-like feel. When I run my hand over it, there’s almost a hairy texture. While I don’t plan on rubbing up against the walls all that often, I’m glad that we invested in a high-quality paper.

So what did it cost?
Well, 8 double-rolls of this paper cost $1,320 and the installation cost $1,350. It’s admittedly more than I thought I’d spend on my walls, but there’s no way that the room would have this mood without the paper, and the value of hiring it out to avoid papering 9’ ceilings while nearly 9 months pregnant is well worth it.

Plus, having the project done in 6 hours is a real bonus for us considering we still have our house torn apart from the latest kitchen re-paint and the piles of baby stuff we’re accruing and storing in the dining room. The urge to nest is real and having this room set up to receive furniture and baby gear is going to make me sleep so so soundly tonight.

I can’t wait to fill this room with furniture and teeny tiny baby clothes, not to mention putting a real human baby in here. Stay tuned as I have more design plans and more nursery goodies to share!


